Category Archives: Other Blog Contents

Featured Blog: 7 Tips for Shooting from a Helicopter by Peter West Carey

this is a blog i read recently by Peter West Carey and thought you may like to read it as well 🙂

I hope you will have the opportunity to shoot photos from a helicopter once in your life. It is a fun and amazing experience, especially for those of us who enjoy flying. While you may have noticed a video by the high-profile photographer Chase Jarvis showing how he got ready for a shoot hanging from the side of a helicopter, chances are your own experience will not be anything like that. It might be a scenic flight over your local city or maybe while on vacation. It might even be for an assignment.

No matter which circumstances end with you hovering above the landscape, I want to impart some advice from my experiences taking photos from helicopters to help you make the most of your limited time.


Doors Off, Please

If at all possible, fly with the doors off. Depending on your situation, you may be able to request this (assignment) or not (vacation helicopter ride). Always ask. But also realize that it can get cold with the doors off, so be prepared for the temperatures.

Shooting through any glass affects the resulting image and that is why it is ideal to have no barrier between you and your subject. Liability reasons often prevent, or dissuade, certain operators from removing doors while others tout it as a perk, such as volcano tours in Hawaii who boast that you can ‘feel the heat’ (in a safe way).

Peter-West-Carey-100902-092053-0398

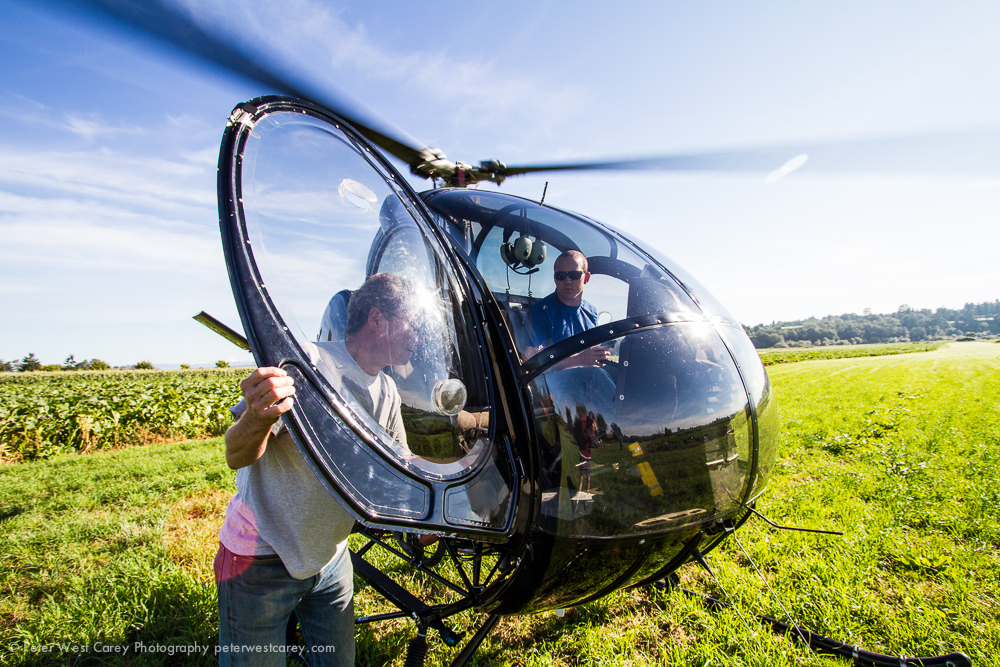
You will likely be buckled in with a four or five point harness. This means a strap over each shoulder and then a lap belt as in a car. It will limit your movement more than your car seatbelt will, but with some wiggling, you will find you can still turn sideways out the door to get your shot.

Also, if you are lucky enough to get a ride with the doors off, realize it is harder to change lenses. Not only that, you will need to secure your equipment and there may be controls in the way if you are sitting up front.

To help with all of this, simplify and be safe. I have used some clips normally used from rock climbing to help secure my camera around my belt or the safety harness in the helicopter. Some type of tether is good piece of mind as you will be in a new environment and one slip will mean a lost camera.

A tether for your bag is also a good idea, but if you’re simplifying, you will leave the bag behind. A photographer’s vest, with pockets for filters and the like, can be very handy to keep things secure and close.

Peter-West-Carey-Hawaii2012-1103-8704

Watch The Blades And Skids

Be aware of the helicopter rotor blades and skids (the ‘feet’ the helicopter stands on while on the ground) not only for your safety, but also for framing your shot. Before the helicopter takes off, judge your widest focal length before the blades or skids start to show. Once airborne, check again with some test shots.

The thing with the blades is, they can be finicky. If you are taking a shot and need the vertical elements in it, and know the blades will interfere, you can still shoot a high-speed series of images and it is likely that one will not have a blade in it. It’s a timing issue and while the blades are turning thousands of times a minute, it can be done. From my own experience, I have found one in eight shots was clean of any blades.

Knowing your limits will save you time and frustration in post-processing later.

Here are two examples of ruining a shot by not being careful of the blades or skids and then putting in the effort to keep them out of the shot.

Peter-West-Carey-100902-092715-0418
Peter-West-Carey-Hawaii2012-1103-0267
Peter-West-Carey-100902-092733-0422
Peter-West-Carey-Hawaii2012-1103-0268

Bring Two Cameras if You Can

Changing lenses without introducing dust inside the camera while the wind whirls around is impossible. Not only that, you stand a decent chance of dropping gear and never seeing it again. For these two reasons, it is a good idea to bring two cameras with two different lenses; a telephoto zoom and a wide angle zoom. I suggest a zoom for the wide angle because you won’t know in advance the maximum angle you can achieve before rotor blades and skids begin to appear.

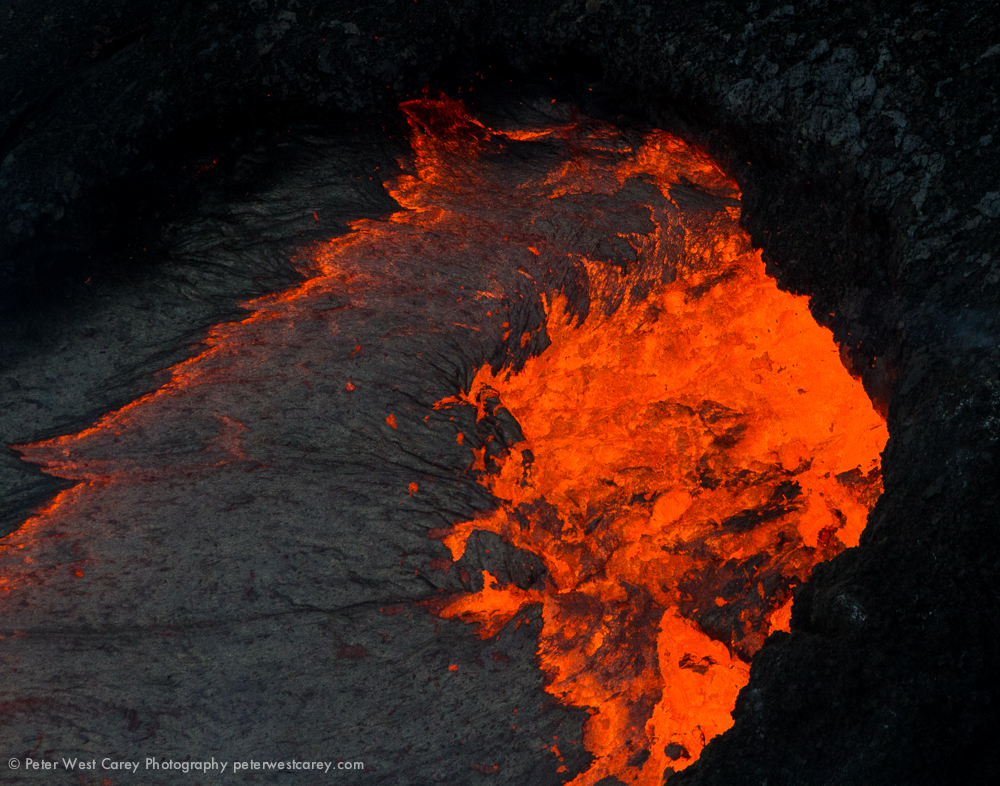
Having a couple of lenses with varying focal lengths is handy when shooting from a helicopter. You will not always be able to get closer to a subject physically, but a telephoto zoom can. Let me show two examples of what I mean.

The shots below were both taken above Pu’u O’o in Hawaii Volcanoes National Park on Hawaii, The Big Island while touring with Paradise Helicopters. This was a press trip and we were up there to see what we could see, without a specific assignment.

When we got close and passed by the lava pool, we had to keep moving and bank to stay away form the noxious gases which lead us to take about three passes on each side. On one pass I opted for a wide angle shot at 14mm with a Nikon D800E. And on another pass I zoomed in with a 300mm lens on a Canon 7D for some details of the lava splashing out of the pool.

Peter-West-Carey-Hawaii2012-1103-0177
Lava Lake

Communicate

We all know communication is important and that goes doubly when photographing from a helicopter. Chances are you will have a headset during your flight which allows for muting the sound of the engine and rotor and also for talking with others onboard, including the pilot. Some units are voice activated, some require pressing a switch which can cause frustration when you realize you’re telling the pilot to hold steady and he or she can’t hear you.

Peter-West-Carey-Hawaii2012-1103-0025

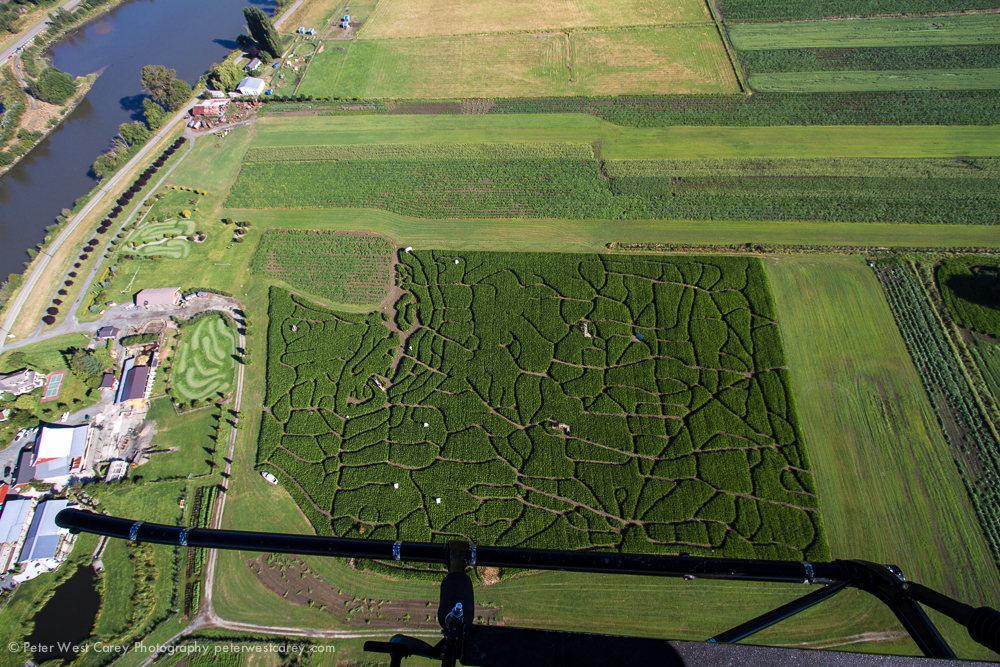
Before take-off, before the blades start churning, talk with the pilot about what you want to accomplish on the flight. Let them know what’s important to you and where you might want to spend some time loitering. One of my flights was around the island of Hawaii and the pilot knew to place me in the front seat so I would have an opening window to shoot from. In another case I was on assignment to shoot a corn maze and had to constantly tell the pilot where to go to get different shots I had in mind.

In both instances, my job was made easier by communicating what I wanted to shoot. If you are on a sightseeing trip with others, your options may be limited, but it is still important to let the pilot know what is important for you to clearly photograph, which is different than just ‘seeing’ it.


Stay Inside

While it is hip and cool to imagine yourself hanging from the side of a helicopter to get that once in a lifetime shot, chances are your experience won’t be as spell binding. The guys that get those assignments (and pay the insurance premiums) aren’t reading this right now unless they are thinking of ways to correct me.

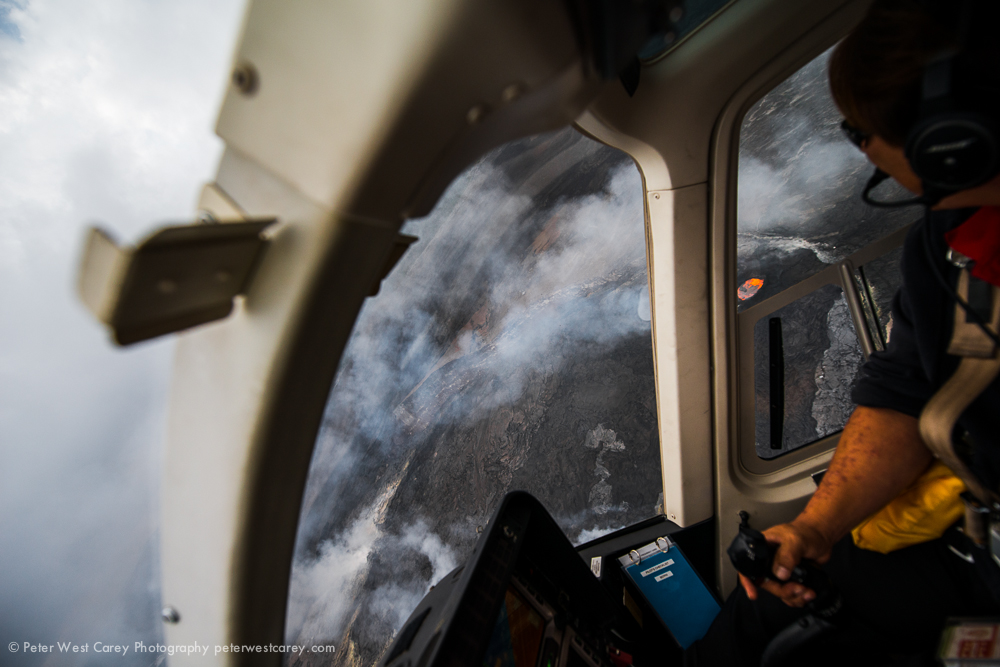
And that’s why I say, stay in the helicopter. The moment you lean outside the protection that the shell of the craft affords, the downdraft can be punishing and knock you seven ways to Sunday. The same goes for poking your lens out a window. You might be afforded a small window like this one:

Peter-West-Carey-Hawaii2012-1103-0076

And it will be useful, but the moment a long lens gets too far outside, the rush of air will cause a lot of vibration. Try to keep the end of lenses out of the airstream for sharper images.


Include the Helicopter

To give a sense of where you are, include some of the helicopter at times. Maybe not a blade, because they look out of place without context. Here I am thinking part of the interior with the outside showing. Getting back to the volcano pictures, I wanted to show how we were banking over the lava rather than static shots of just the lava.

Peter-West-Carey-Hawaii2012-1103-0155

The same can be done with the land zipping by below if you happen to get a front row seat.

Peter-West-Carey-Hawaii2012-1103-0032

Most people haven’t seen the inside of a helicopter and only have a Hollywood version in their mind. Show the reality of how you got those amazing shots to help with your overall storytelling.


Increase Your ISO and Shutter Speed

Lastly, helicopters vibrate. Some a little. Some a lot. And they can be bouncy or smooth. My suggestion is to increase your ISO toward the high end of what you find is tolerable. Along with that change, as most of your subjects will be far away from the camera, choosing a wider aperture in Aperture Priority mode will help speed up your shutter speed. All of this is in effort to reduce camera shake. Certainly bring your image stabilizing lenses or camera bodies, that will help.

Most of all, don’t forget to lower your camera from your eye from time to time and simply enjoy the fact that you’re flying! Shooting from a helicopter can be a great experience and I hope you make the most of your time in the sky.

the origional blog address is http://photo.tutsplus.com/articles/shooting-articles/7-tips-when-shooting-from-a-helicopter/?utm_source=feedburner&utm_medium=feed&utm_campaign=Feed%3A+Phototuts+%28Phototuts%2B%29 as always please feel free to share using the buttons below Jay If you enjoy this blog and wish to donate to its running please do so here (completely optional so if you dont want to you dont have to)

Featured Blog: 100 Ideas that Changed Photography by Chase

this is a blog i read recently by Chase and thought you may like to read it as well 🙂

Every so often, I am reminded of the tectonic shifts in photography that seem to skip under the radar in our exploding world of photography and photographers. No harm, no foul — but it snaps my head back into place when pointing these out from time to time.

Mary Warner Marian’s book 100 Ideas that Changed Photography” does a damn nice job highlighting some of these shifts. It’s her personal take on the most influential ideas that have shaped photography, from the daguerreotype in the early 19th century up to the digital revolution and beyond.

Now… top “100″ lists are always risky business. Inevitable omissions beget unavoidable criticism; the author’s author-ity (and intelligence) gets questioned; the business of “TOP 100″ lists is decried. NO so long ago, when I created a little 240 page book of portraits titled “Seattle 100, which featured my personal curation of 106 people influentially driving culiture in Seattle, it was not to prescribe the “best” 100…not “THE” 100, but simply A 100 if you catch my drift. Fortunately for us, Marian’s book seems to take the same approach — curated list of her own design and one that I respect. Ultimately, this book is a reminder that much of the fear and chatter expressed in our modern day, the alleged affronts to the “craft” of photography by new technologies, are seriously misplaced. The art of capturing light has been evolving since Christian Gobrecht first illustrated the workings of a camera obscura.

As the author Marien puts it:

While it may seem that a new photo technology is born every day, photography is still what we make it, not what it makes us.

chasejarvis_100IdeasThatChangedPhotographyIDEA # 1: THE CAMERA OBSCURA When Christian Gobrecht illustrated the workings of a camera obscura for Abraham Rees’s The Cyclopedia or Universal Dictionary of Arts, Sciences, and Literature (1805-22), he was careful to show how the device created an inverted image.

Collodian

chasejarvis_100IdeasThatChangedPhotographyIDEA # 13: COLLODION Photographers who used the collodion process had to process their glass plates before and after exposure. They brought a portable darkroom and sometimes employed assistants to help.

The Lens

chasejarvis_100IdeasThatChangedPhotographyIDEA # 9: THE LENS Specially designed weights or impromptu inventions were attached to the shutter to create timed lens exposures.

Negative/Positive.

chasejarvis_100ideasthatchangedphotographyIDEA # 4: NEGATIVE/POSITIVE The negative formed the basis of photography until the digital age. It is based on the reversal of dark and light tone.

hasejarvis_100IdeasThatChangedPhotography

Images and captions courtesy of Laurence King.

the origional blog address is http://blog.chasejarvis.com/blog/2013/02/100-ideas-that-changed-photography/?utm_source=feedburner&utm_medium=feed&utm_campaign=Feed%3A+ChaseJarvis+%28Chase+Jarvis+Blog%29 as always please feel free to share using the buttons below Jay

Featured Blog: 5 Reasons You Should Say No To Multitasking by Arfa Mirza

this is a blog i read recently by Arfa Mirza and thought you may like to read it as well 🙂

A few days ago, my secretary went on leave. Before leaving, she was kind enough to ask me if I need a replacement for her as she will be off for two weeks. Initially, I liked the idea but then a thought struck me. Every now and then I see professional newsletters and weblogs crying out the importance of multitasking for a thriving professional life.


(Image source: Fotolia)

So I decided that while my secretary is away, I’ll take this as an opportunity to try out multitasking, you know, to brush up my productivity skills. The very next day, I started implementing multitasking to my regular professional life. My day buzzed with phone calls, scheduling and re-scheduling, meetings and coffee-making, all on top of my routine tasks.

It was not long before I started to feel that this new routine is seriously impacting my productivity. What I am about to share with you in this piece of writing is the essence of my multitasking experience.

1. Loss of Focus

In the two weeks, there have been times when I had a really brilliant idea for a campaign design, but I was distracted to do another task, after which, I couldn’t recall what the idea was. I’ve heard of scientific facts about how the human mind woks best when it is focused on a single train of thoughts. And I was actually experiencing one myself.

When we try to focus on multiple unrelated tasks or thoughts, simultaneously (like regular multitasking), it becomes difficult to regain focus and remember where we left off in each of those tasks.

There are often projects or jobs that need your special focus and concentration – more than the regular ones – but when you are needed elsewhere, your mind subconciously shift your focus onto other tasks. And you end up frustrated, like me.

Recommended Reading: 5 Ways To Keep Yourself Focused At Work

2. Low Grade Efficiency

It is a common misconception that multitasking increases your efficiency. In fact, you tend to just skim through the tasks to get more done. This will slow down your productivity level, especially with tasks that require brainstorming and a proper thought process.

Frequent multitasking affects your efficiency like shutting down and restarting the CPU affects the efficiency of your computer and the work it is doing.

If you muster up your focus for one task and do it with all your mind and heart, no matter how small or insignificant the task is, it can prove to be more productive to yourself and your employer/client. Having your focus scattered across too many things, may lead you to mess up real important things like deadlines, important meetings and scheduled tasks.

3. Brain Drain

Brainstorming, analytical thinking, problem solving and creativity are associated with every professional’s life. These terms are also especially important for writers, designers and other creative professionals.

However, multitasking has often proved to be just the right poison for these brain-involving activities.


(Image source: Fotolia)

Professionals, who flip between jobs and tasks more frequently, experience a brain drain in terms of analytical and creative thinking process. Moreover, in a human mind, creative thoughts, ideas and solutions have a very short shelf-life, and they have a good tendency to vanish as quickly just as how they pop up in your mind unannounced.

Once two or more thoughts leave your mind without being pondered upon, your mind becomes more prone to a creative block or brain drain for a long time.

Replenish your Creativity with our articles on creativity.

4. The Time-Saving Paradox

Many professionals are of the view that doing a number of tasks concurrently saves you a lot of time and thus makes you ‘efficient’. Well, there is another side of the story which many of us tend to overlook, as in overlooking human errors.

It is a matter of common sense that when you are working on multiple tasks and one task becomes the cause of distraction for the other, there is a higher chance of you messing up, and both tasks (or more) are affected. The thing with mistakes is that it needs rectifying. And fixing a mistake takes time.

So basically, you are saving up on your time (by multitasking) to fix the problems created (while multitasking).

Check out: 50 Time Saving Firefox Add-Ons

5. Anxiety and Stress

Another area you won’t expect to be affected by multitasking is your physical and mental health (cue anxiety and stress). Multitasking and frequent interruptions caused by it are sources of stress that can have a notable impact on your mind and body. It is a common fact that whenever demands exceed abilities, stress is bound to follow.


(Image source: Fotolia)

Over time, the stress of multitasking may even become dangerous when fatigue and mental fogginess becomes more prominent, and both productivity and passion for work decline. In the kind of work culture we have developed in today’s world, multitasking seems inevitable, even viewed as an advantage when it comes to job-seeking.

However, according to repeated research and my own personal experience, multitasking is not only absurd, it is counterproductive as well.

More: 8 Tips To Simplify Your Work Life

To Conclude

By writing this article I am not at all suggesting that multitasking is not possible for the human mind. I would rather say that although we can always add one more ball to our juggling act, every time you multitask, you have less attention for creative thought and memories.

No matter how demanding your job is, do not let multitasking take a heavy toll on your work, or on you.

Take a look at: Productivity Tips For Freelance Web Designers

the origional blog address is http://www.hongkiat.com/blog/no-to-multitasking/ as always please feel free to share using the buttons below Jay If you enjoy this blog and wish to donate to its running please do so here (completely optional so if you dont want to you dont have to)

Featured Blog: Creating Your Personal Tabletop Studio by Jose Antunes

this is a blog i read recently by Jose Antunes and thought you may like to read it as well 🙂

The practice of tabletop photography can start with a sheet of paper, some cardboard and window light. But soon you’ll want more control in your own little studio. To help, we’ve looked at some alternatives for you.


This strange looking contraption is the tabletop studio I use to photograph small objects at home.

Photographing small objects at home can be both fun and technically challenging, and a good investment of time. It is an ideal pastime when the weather is not inviting you to go out and you still feel the need to photograph something. And it can also become a passion itself, a live and continuous lesson about the use of light.

You may have a collection of miniatures you want to photograph, or maybe you brought some pebbles from a last trip to the seashore and want to create some images with them. Whatever your needs in photographic terms, the obvious and best path is usually to create a small table top studio at home, using a table as the center of your new working area.

If you’ve a spare table that you can keep using all the time, then you’ll have the best solution in the world. Also, if possible, a table that has enough space so you can keep your gear and other materials close by. Don’t forget to consider light. You may need to place your table near a window if you’re not savvy with strobes.


The absolute control you can have over light. Even placing it under the subject (a tomato in this case), gives some interesting lighting.

Believe me, it is rather simple to photograph small objects in such a setting. This said, many of the pictures I see on the web, mostly from people trying to sell stuff, are not very inspiring and do not make you want to buy whatever they’re selling.

The excuse usually given is that they only have a compact camera. This doesn’t really matter because these days you can do some fantastic imagery with any camera if you know how to use it and pay some attention to the way you setup your tabletop studio.


Start With a Single Sheet of Paper


A single sheet of white paper and some foam core over a table, close to a window, can be a starting point for your tabletop photography.

Furthermore, modern day compacts offer you not only good LCDs where you can compose the image, but also close up options that let you get macro images, something you can only do with a DSLR after buying a lens that costs more than most compacts.

If you have a compact camera model that lets you control exposure, preferably in a full manual mode, you’ll be able to do tabletop photography at a superior level, believe me. Just remember that usually, with a compact camera, you’ll want to find the “no flash, thanks” mode, and it will work fine.

All you’ll need to start is a single piece of heavyweight paper (white, black or whatever colour you feel suitable) to use as the base and the light from a window (preferably passing through a white curtain or some other way of softening it). Reflectors, like foam core or sometimes aluminium foil or other reflective surface, will allow you control light on the darker side of the object.

I’ve done lots of images this way and it’s a good starting point to explore tabletop photography and see if you enjoy the activity. If you want to go further, then you can invest in a bit of DIY or Do It Yourself, and create a more sophisticated setting for your photography: a mini-studio in a box.


The Cardboard Box Studio


A cardboard box can be used as a DIY – Do It Yourself light tent for tabletop photography.

Get a cardboard box and open holes on the top and both sides, so you can let the light enter in your homemade light tent. You can use any semi-transparent white material for the windows (tracing paper or bed sheets are an example accessible to everyone, but you can go for more resistant materials). Glue or tape the diffusers in place.

Inside the box you’ll need a white sheet of heavyweight paper (to keep things simple, but you can change it for other colours for different results) that will be the base of your studio. Place it so it creates a ramp that mixes background and bottom, so you get a clean look in your images. You’re done.

As mentioned previously, using the camera’s flash is a bad idea, so you have to think of alternatives. You’ll soon discover that even the light from the sun will do a great job providing a soft diffused source of light for any object you place in the light tent. The white surfaces reflect light around and create a good starting point to anything.

With a couple of desktop lamps you’ll be able to use your light tent even when the sun is not around. Watch for lamps that generate heat, and some of the modern day lamps that consume less energy offer a good solution for long hours of fun. Two desktop lamps, one for each side of the light tent, will give you enough light for most purposes.


Make Your First Reflectors


When starting out you do not need to get sophisticated lighting systems with umbrellas or softboxes.

Remember the pieces of cardboard left from the windows you’ve cut on the box? Cover them with aluminium foil or other reflective surface on one side and white on the other and you’ll have some extra reflectors to use in your studio, in case you need to control reflections inside it.

Also, think of making a pair of black surfaces to eliminate reflections. Because you’ve cut three pieces of the box, you can get 2x white, 2x silver and 2x black, enough to use in various situations if you use both sides of the cardboard.

If you have a camera that accepts the use of external flashes, then you’re ready for the next step in this adventure. Depending on your system you’ll be able to use cables, trigger flashes by IR or use a radio system.

Cables are great to start with but remember to buy them long enough for your needs. Infrared works fine as long as you do not start to slave flashes from the master unit. Popular opinion at the moment is that radio triggers are the best compromise between convenience and reliability.

After having used different systems, some homemade, for my table top photography, I’ve settled for a commercial system that suits all my needs. I always felt that light tents sold in the market are a bit claustrophobic for me. So when I found a system like the Modahaus Tabletop Studio I was hooked.


The Commercial Tabletop Studio


A Tabletop Studio and Steady Stand make a nice pair for tabletop photography.

These tabletop solutions come in different sizes, are flexible and versatile, allowing me to add and remove a light tunnel, (on the 216 model) or a light cone (on the 400 model) as required, giving me freedom of movement and unrestricted access to the objects I want to photograph.

I discovered the Modahaus system during a photography workshop I attended by photographer Don Giannatti. Afterwards when I visited the Modahaus website I thought a simple tabletop studio was all I wanted, But in the end I also bought a Steady Stand, because I can use it as an alternative “light tent” together with the Tabletop Studio, giving me more control over the light. It is not the ideal solution for all types of objects, but it doubles as a good system to use with small cameras and iPhones.


The Steady Stand works both as a light tent and also as a support for document and jewelry photography.

In fact, the Steady Stand, available in different sizes, was designed from the outset for iPhone 3GS, iPhone 4 and iPhone 4S, Androids, smartphones and most compact cameras. The Steady Stand provides, as Modahaus people state, “an elevated platform support for overhead product photos ensuring pin sharp, totally square-on, precisely composed, perfectly exposed photos and document copies.”


iPhoneography and Beyond


One earring and a watch from my collection photographed using the Steady Stand.

The clear translucent side walls soften and diffuse incoming light helping eliminate harsh shadows and provide clean uncluttered reflections on shiny subjects such as jewelry. The solution offers amazing results for small products, flat artwork, iPhoneography, photo based art and document capture.

As the watch photograph shows (I have a collection of watches and photographed them using the Steady Stand), it is a great solution. And it is also perfect to shoot necklaces, earrings and other small jewelry, for example, as you can hang them from the top and let them slide through the hole.


You have different backgrounds to choose and mix, and because they’re translucent you can use them with light behind, for special effects.

If you’re looking for a tabletop solution and want a ready-to-use option, take a look at all Modahaus products: portable tabletop studios and Steady Stands. I particularly like the tabletop studios, as they are flexible, sold with different colour backgrounds and come in a nice robust flat pack that is lightweight, easy to carry and assemble anywhere. All these products are made of an advanced polymer that is easy to clean, is wrinkle free and is better than a light tent or a cube.


Get Your Lights Under It


Being able to place a flash behind the background enhances the lighting options of the Tabletop Studio.

One of the things I like the most in terms of tabletop photography is to use lighting from under my subjects. I use a translucent sheet of acrylic under the table, supported on some boxes, in order to place a flash with a Rogue Flash Bender diffuser under it, and then add the other flash/flashes and eventually reflectors to create the mood I want. I can also place a flash behind the sweep background, for some special effects.

Since I bought the Tabletop Studio and Steady Stand, I’ve stopped using my other older solutions and rely on these “toys” for my tabletop photography. I very much like the results and the fact that I can easily take it anywhere and get my studio ready for a photo session in seconds.


Mixing the different colours on the background offers new creative options when photographing objects.

Last but not least, remember that you’ll need a tripod for most of this photography and some means of making the exposure without touching the camera – use the timer, a cable release or a radio trigger. And remember to check the white balance in your shots. Above all, have fun and create lots of photographs. Even if your first tabletop studio is just a piece of white cardboard and some white paper reflectors.

Some links to tabletop systems:

the origional blog address is http://photo.tutsplus.com/articles/lighting-articles/tabletop-studio-a-photographers-playground/?utm_source=feedburner&utm_medium=feed&utm_campaign=Feed%3A+Phototuts+%28Phototuts%2B%29 as always please feel free to share using the buttons below Jay If you enjoy this blog and wish to donate to its running please do so here (completely optional so if you dont want to you dont have to)

Featured Blog: 3 Undeniable Reasons To Pursue Personal Work — Why Being The Guinea Pig Pays Off…Bigtime by Chase

this is a blog i read recently by Chase and thought you may like to read it as well 🙂

I have been a long-time, huuuuge proponent of taking time to pursue personal work. Its in fact my pursuit of personal work to which I attribute a good bit of my success. In short, it’s by taking time to investigate your personal vision that you will be rewarded. My homie Joey L., has been finding time to uncover personal gems throughout his career. And you’ll see in his guest post below – it has paid off for him bigtime. Take it away Joey. – Chase

Thanks Chase and greetings Chase Jarvis readers. I am humbled to be able to post here, and speak to you directly.If you’re familiar with my photography and behind the scenes blog, you probably already know that I’m a huge advocate of photographers spending time on personal work.

Although I’ve shot many commercial photo shoots you may or may not have bumped into on the street or on a magazine rack, I’m glad to say I’m actually most associated with my portraits of people from Southern Ethiopia, and the Mentawai Islands in Indonesia.

chasejarvis_JOEYLhamar_tribe_ethiopia
The Image above is a Panoramic image of Hamar Women at Sunrise, Southern Ethiopia. Photographed with Mamiya 645DF with Phase One P65+ Digital Back. Lit with 1 Elinchrom Rotalux Deep Octa and a Profoto 7b power pack.

When I say “personal work”, I’m referring to any body of work that wasn’t paid for by a client; work you created out of sheer passion. Now, I’m not saying I am not passionate about my commissioned jobs! Lately I’ve been fortunate to work on some truly interesting stuff that keeps me wired all day long. However, what I am talking about is a project that comes 100% from your soul. While your commissioned work may be an artistic collaboration with a brand or product, your personal work is an extension of yourself.

I wanted to take this opportunity to share how committing to personal projects can directly benefit your portfolio and career as a whole. Even if a photographer has never done a commercial shoot before, it doesn’t mean they can’t get hired off a body of personal work that relates to a brief. Whether you like to shoot landscapes, beautiful women, quirky characters or still life, there is a client out there that is looking for this type of work. For me, its environmental portraits. Images of humans in their surroundings extends to everywhere around the globe, not just the endangered cultures in remote locations I choose to focus on. There is a market for this type of photography, as well as many types of photography you like to work with, I’m sure.


chasejarvis_JoeyL_killing_lincoln_movie_poster_blog
The movie poster above, shot for National Geographic’s “Killing Lincoln” just came out the other day. I think it’s a perfect example of my personal style extending to a commissioned job. The lighting is actually quite simple. A Briese DP90 camera left, high above eye-level of the actors, angled in such a way to get dramatic shadows on the opposite side of the face. Inside is a 5K bulb, which allowed me to get an exposure ideal for my Phase One back- which only really shoots up to ISO200 before the grain is terrible. There are 3 constant lights on the background set- 2k Arri fresnels at the left and right side, and a 5k Arri fresnel in the middle. A hazer machine brought in a thin layer of “fog” to help the light feel more painterly. The microscopic particles of the haze catch the light trails. To view more information about this project, check out my blog post here.

Now, I realize a lot of you are like me, and enjoy nerdy gear-related technical information too, so I’m dropping some of those goodies below each one of the photos.

Okay, let’s start with the 3 main points:

1- Personal Work Keeps The Portfolio fresh
ChaseJarivs_joey_l_photographer_turkana
Above you will see me half submerged in Lake Turkana, Ethiopia, photographing a man named Shallowgo checking his fishing nets. The final image is below. I’m shooting with Mamiya 645DF with Phase One P65+ Digital Back. Assistant is holding Elinchrom Rotalux Deep Octa and a Profoto 7b power pack.


You’d be surprised at how many artistic people there are out there who reach a certain level, then simply give up on improving their craft. Even photographers with extensive client lists who were once busy can find themselves going through dry periods because they forgot the value of progressing their work to even greater heights and creating something new.

In the past, I have absolutely been guilty of this. Sometimes I work myself into a creative funk and it takes months to realize I haven’t been pushing myself hard enough. Then all of a sudden, a storm of new ideas hits me, and I start experimenting and trying new things I’ve never done before. Sometimes these new shoots work out and provide valuable pieces to my portfolio, but sometimes they don’t work at all. Even if I spend a week in pre-production, a whole day shooting, and walk away with one new picture that is portfolio worthy, I’m happy. I recommend a photographer’s portfolio to not last over 30-50 images, so a single photo every once and awhile is going to build this body of work in no time.

The best thing about testing new ideas in a personal setting is that there is no pressure to deliver. A real commercial set where people have paid you to deliver a certain amount of key images is not exactly the place to be testing new wonky ideas you aren’t sure will work. So, you start a guinea pig project on your own time to try new things, and hopefully you can implement what you learned on paid gigs later.

Failure is okay. After all, as photographers and filmmakers we don’t even have to show the world the work we failed all. In our portfolios, all we show is a pretty little selection of where we succeeded. The rest can stay hidden on a hard drive forever, (which you can decide to keep or destroy with a sledge hammer, depending on how bad it was.)
2- Passion Draws Eyes
ChaseJarivs_JoeL._sadhu_varanasi
ďżź
When he was young, Lal Baba’s parents arranged a marriage for him. Uncertain about his future, he ran away from home in Bihar Siwan and took up the lifelong task of becoming a sadhu. This was taken in Varanasi, India.


I like to show people updated portfolios. Whether I meet new potential clients, or co-workers who have known my work for years, I always like to start the meeting with new personal work. This way, these new images become a conversation piece, since there are usually some interesting stories behind how the images came to be. “I got a flat tire in Ethiopia and was stranded for days” can be an interesting conversation.

Passion doesn’t lie. When other photographer’s show me their work and I can hear an undeniable sense of excitement in their voice, it gets me interested in what they have to say. Instead of pretending to be excited about work that’s several years old, it’s much better just to go out and create something new that keeps your blood pumping.

Sharing personal work is one simple way of showing passion. The last person someone wants to hire is someone who doesn’t care about what they do, and only creates when they’re on a job. There is a way better vibe, and it is easier to be productive around motivated people.

3 – Personal Work Gets You Hired To Shoot What You Like to Shoot

ChaseJarvis_JoeyL._robert_de_niro

The above portrait I took of Robert De Niro was for Screen Actor’s Guild which has light reminiscent of my personal portraits. 


When you photograph a subject or in a certain style that interest you, it’s usually the same style you end up getting hired to shoot. An art director has a lot of confidence in hiring a photographer who has already shot something that vaguely matches their vision for the project. Personally, a lot of the times I am hired because of what’s already in my portfolio. I often hear something like “we used this photo of yours as a reference, and we’d love if you could create something similar for our photoshoot.” This doesn’t mean you should do the exact same thing you’ve already done, it just means that you’re being hired for what you’re most passionate about! Now it’s time to apply those skills for other purposes. I’ve developed a lot of skills I wouldn’t have if it hadn’t been for keeping myself busy. For example, I’ve found that working with foreign subjects who aren’t used to photography has really boosted my communication skills in every aspect of my life. Another example, is that I use a lot of the same lighting styles first developed in a safe, controlled studio setting when shooting in the field.

Another key thing I’d like to mention here is spreading your photographs by using the power of the internet. With todays technology there’s no excuse for your work not be seen. With social media, blogs and photography contests such as PDN, if you do good work, someone is going to see it and share it. This doesn’t mean that these tools do the work for you, but it does give you a platform that spreads your work instantly. The more eyeballs on my portfolio, the more likely it is that a single one of those pairs of eyeballs can translate into a real job.

So now a plan of action. Ask yourself these question: What’s something you’ve always wanted to photograph that excites you? How are you going to photograph it differently, and make it yours? And most importantly — how are you going to make it happen?

My Next Personal Project
I want to share my next kickass personal project with you. It’s overly ambitious, and recently keeps me up at night with extreme jolts of both fear and passion. (A good sign- this means it’s something worth doing.)

People of the Delta is my first major film project, which was written in collaboration with the tribes I’ve photographed in Southern Ethiopia while working on my personal series “The Cradle of Mankind.” This video pretty much sums up everything I could write about the film in this post, so if you’re interested, take a gander here:

Kickstarter Campaign for: “People of the Delta” Film Project from Joey L on Vimeo.

You can check out everything about the project on the Kickstarter website here:
I’m not going to ask you to back this project unless you can get something valuable in return. I’ve set up a bunch of interesting rewards geared at photographer’s to help this project happen. On the Kickstarter site, you’ll find all sorts of rewards. There are downloads of the final project, a complete lighting and production tutorial on the creation of the film, gallery prints, gear with my photos on it, and even portfolio reviews where I’ll sit down with you on Skype to have a one to one chat.

Another reward I just launched is an NYC photography workshop with me, and spaces are quite limited. If you’d like to meet me and see me ramble about Lighting, Photoshop and other stuff related to our industry, this would be a good chance.

I’m guessing that if you’ve sat there and read this whole article, you’re passionate enough about what we do to go out there and start your own project. You don’t need fancy tools or a plane ticket to some remote place, all you really need is a vision and a strong desire to make it happen.

Joey L.

People of the Delta Kickstarter:http://www.kickstarter.com/projects/joeyl/people-of-the-delta-film-project
Portfolio Website: http://www.joeyL.com
Behind the Scenes Blog: http://www.joeyL.com/blog
Twitter: https://twitter.com/joeyldotcom
Facebook Page: https://www.facebook.com/pages/Joey-L-The-Photographer/166804470002802

the origional blog address is http://blog.chasejarvis.com/blog/2013/02/3-undeniable-reasons-to-pursue-personal-work-why-being-the-guinea-pig-pays-off-bigtime/?utm_source=feedburner&utm_medium=feed&utm_campaign=Feed%3A+ChaseJarvis+%28Chase+Jarvis+Blog%29 as always please feel free to share using the buttons below Jay

Featured Blog: Refusing Bad Business: A Luxury You Can’t NOT Afford by Addison Duvall

this is a blog i read recently by Addison Duvall and thought you may like to read it as well 🙂

As someone who’s worked on both sides of the freelancer-client fence, I give a lot of “insider” advice to designers on dealing with their clients. One of the most common problems I hear is that designers would love to be able to turn down their worst clients – the ones who pay late, don’t pay at all, or who just generally cause way more trouble than they’re worth. But the problem, these designers tell me, is that they just can’t.

Image Source: Angry on Bad via Shutterstock

They have bills to pay, mouths to feed, and so on. Whenever I hear this complaint, I try to root out the source of it. What is causing these designers to have this mentality? Why don’t they see themselves as capable of having the so-called “luxury” of refusing bad clients? I think they’re looking at things from the wrong end. All they can see is ‘I need to pay my bills and can’t afford to be choosy,’ when the whole client relationship process is really about so much more than that.

Sitting Up Straight

When you start things off wrong, you will finish them wrong. That’s just a fact of life, and it applies to virtually everything. I’ll share an example from my own life that some of you have probably dealt with as well: design-related injuries. I had the world’s crappiest chair, which wrought major havoc on my back and shoulders until I finally replaced it this year. Most injuries to the back, shoulders, and wrists are caused by poor posture (and crappy chairs – I’m sure there’s a study on that somewhere).

If you sit down at your computer and your spine is bent in a weird position, or your hand is a bit crooked on the mouse, it’ll be okay for awhile. You’ll probably feel no pain for the first hour – maybe even two. But do that every day for a year and you’ll be in a brace and out thousands of dollars in physical therapy bills. How do you avoid that kind of catastrophe? By sitting up straight with proper posture in the beginning. I know, I know – I sound like your Mother. But she was right. An ounce of prevention is worth a pound of cure and all that. And eat your vegetables!

You have to start in a good position to end up in one. If you want a lasting, mutually beneficial relationship with quality clients, the cold truth is that you may to have to make some short-term sacrifices in the beginning. You might have to go into a bit of a crunch financially (yes, I said it), or refuse to work with a certain type of client if you notice bad behavior start to crop up. This isn’t to uphold some lofty ideal of “honor” or anything, but simply because every crap job you take puts you that much further away from your true goal of doing work you love and are proud to display to others. It might seem irresponsible to take a loss over a quick, cheap gig, but if you have a truly valuable service to offer valuable clients, it’s actually irresponsible not to.

Image Source: Brainstorming via Shutterstock

Sit up straight! Stop seeing yourself as not “eligible” to refuse bad business. Instead, start seeing it as your duty to do so. How else are you going to make room for awesome clients if your time is being wasted by the crappy ones? Work on changing yourself, rather than your clients. A bad client will never, ever, ever, ever change into a good one. Never ever. I can’t repeat this enough. You’re going to get sick of hearing it. But I still need to say it, because there are many, many designers out there who still don’t understand. It’s one of my main talking points for a reason; I see it over and over. Quit polishing the turds and find yourself some gold bouillon.

Dining Like Royalty

How does a designer go from struggling to put food on the table to beating clients away with the proverbial stick? Many designers are offended at the suggestion that they turn away work – don’t you know I have a family to feed and/or beer to buy? I get it. I know what it’s like to be a struggling freelancer, to have to take whatever work you can get. But I also know what it’s like to turn away work that doesn’t suit me as a professional. How I got from point A to point B is really not that complicated, nor is it a fluke or just my good luck. I’m not some rockstar creative with an overinflated opinion of myself, and you don’t have to be either.

Image Source: Strong Super Hero via Shutterstock

The key is to change your attitude. I acknowledged that I simply wasn’t going to be able to provide value to the right clients if I kept taking on the wrong ones. I had a great service that my ideal clients needed, and it was just plain irresponsible of me not to make room for them. You owe it to those dream clients, and to yourself, to focus in and weed the garden. Remember, niche = GOOD; generic = BAD. If you dedicate yourself to finding and helping people who “click” with you, you’ll soon be doing less work while making more money. And as a bonus, you’ll be way less stressed out and frustrated. Maybe fewer of you will have such horrific stories about bad clients and I won’t need to squawk so much about them. A gal can dream…

Adapt To New Opportunities

Human beings are extremely adaptable. Just look at how diverse we are. We’ve evolved to adapt to just about any situation – good or bad. If you’ve adapted to the lifestyle of taking whatever clients come your way and scraping to get by, don’t kid yourself that it’s anything more than that – an adaptation to a poor situation. (No, I did not mean for that to rhyme, but I’m going to leave it because I can. You’re welcome.) You may think that having an open-door policy with bad clients is just “how it is” for freelance designers, but it’s really not.

As a talented creative professional, you need to know that you are capable of a lot more than you give yourself credit for. Take control of your own thoughts and actions to make room for a new situation to adapt to. Create those new opportunities and don’t be afraid to eliminate what’s not working.

What Do You Think?

Designers, have you eliminated the worst clients from your roster? What strategies worked for you, and, more importantly, how has it improved your business?

You might also like…

The Remote Designer – Jumping into the Cloud →
Be the Mom: How To Avoid Design By Committee →
Basic Security Tips Every Freelancer Should Follow →
The Dangers of Flexibility: Should You Stand Your Ground With Clients? →

Or, you may like to browse our Freelance category.

the origional blog address is http://speckyboy.com/2013/02/11/refusing-bad-business-a-luxury-you-cant-not-afford/?utm_source=feedburner&utm_medium=feed&utm_campaign=Feed%3A+speckboy-design-magazine+%28Speckyboy+Design+Magazine%29 as always please feel free to share using the buttons below Jay If you enjoy this blog and wish to donate to its running please do so here (completely optional so if you dont want to you dont have to)

Featured Blog: 30 Photographs taken from Creative and Unusual Angles by Laxman

this is a blog i read recently by Laxman and thought you may like to read it as well 🙂

It’s not often considered, but every photograph must be taken at an angle. Your angle might be just an eye level picture of your friends. It might be a birds eye image, or look up from the ground. Whatever the picture, you’ve got to take the photograph from somewhere in relation to the target.

This fact can be used by skilled artists to produce a variety of effects in their images. In this article, we have a variety of both standard and unique angles in photography.

Consider as you read the ways in which these angles may come into play in your future photographs. Whether you’re a professional photographer, an amateur, or just taking a picture with friends, the proper use of angle can work wonders.

Blade Runner

Blade Runner

Enter the Under Ground

Enter the Under Ground

Aurora Bridge In Fremont

Aurora Bridge In Fremont

The Hive

The Hive

The Night Tracks

The Night Tracks

Meherangarh Fort

Meherangarh Fort

Balcony Panaroma

Balcony Panaroma

Hair Raiser

Hair Raiser

Nemo

Nemo

Raining Ghosts

Raining Ghosts

Reflections of Change

Reflections of Change

Reflection

Reflection

Getting Low

Getting Low

Eiffel

Eiffel

The Leading Path to the Lord

The Leading Path to the Lord

You’re Either Shooting or You’re Dead

You're Either Shooting or You're Dead

Funny Photos Taken at Unusual Angle

Funny Photos Taken at Unusual Angle

Waterfront at Stadium’s Bridge

Waterfront at Stadium's Bridge

Fixing the WA Monument

Fixing the WA Monument

Chain Bridge

Chain Bridge

Moon Light Match

Moon Light Match

Intersection

Intersection

Old Faithful & Jupiter

Old Faithful & Jupiter

Rocklin vs. Granite Bay Boys Basketball

Rocklin vs. Granite Bay Boys Basketball

Pool X

Pool X

With Love from Coronado Beach

With Love from Coronado Beach

Slanted Sky

Slanted Sky

Little Push

Little Push

Fun with Water

Fun with Water

Bethlehem of the Jungle

Bethlehem of the Jungle

You may also like…

25 Examples of Monochromatic Photos and Art →
40 Examples Of Tilt-Shift Photography →
20 Inspirational and Free Downloadable Photography Magazines →
Tutorials for Creating Beautiful HDR (High Dynamic Range) Imagery →
20 Amazing Images That Could Be HDR – But are definitely Not →
Inspirational and Free Downloadable Photography Magazines →
Beautiful Examples of Photoshopped Smoke Art and Technique Tutorials →
Amazing Images That Could Be HDR – But are definitely Not →
Amazing Examples of Conformal Photography. How do they do this? →
50 Beautiful HDR Images from 50 World Cities →
Creative Photography Examples using the Polar Panorama Effect →
Examples of Stylish Sabatier (or Solarised) Effect Photography →
Amazing Examples of Conformal Photography. How do they do this? →

Or, you could browse our extensive Photography Archives.

the origional blog address is http://speckyboy.com/2013/01/06/30-photographs-taken-from-creative-and-unusual-angles/?utm_source=feedburner&utm_medium=feed&utm_campaign=Feed%3A+speckboy-design-magazine+%28Speckyboy+Design+Magazine%29 as always please feel free to share using the buttons below Jay If you enjoy this blog and wish to donate to its running please do so here (completely optional so if you dont want to you dont have to)

Featured Blog: Space coverage beyond the shuttle by Steve Mort

this is a blog i read recently by Steve Mort and thought you may like to read it as well 🙂

Today, as a correspondent with responsibility for covering America’s adventures in space, I’m reporting on NASA’s latest exploratory endeavors. 

The US space agency today launched a spacecraft from the Kennedy Space Center here in Florida destined for Jupiter. It’s unmanned, of course, but it’s hoped it’ll provide valuable scientific data on how the first planet in our solar system was formed. This, in turn, could be very useful in discovering more about the origins of our own planet. 

Here’s an audio report I filed a little earlier for Australian Independent Radio News

According to my reporting, many space policy-makers – as well as officials within NASA itself – see this kind of exploration as the key to NASA’s future now that the space shuttle has gone. Sure, private companies are working on taking Americans back to the International Space Station within the next few years, and NASA has the long-term goal of manned flight to the Moon, Mars or an astroid. But the real nitty gritty of space exploration and scientific discovery is often done far away from the media glare and the glory of manned programs.

I hope to cover this aspect of the space program more in the future, with a focus on the huge challenges NASA faces, not only in terms of its budget, but also in terms of focus, direction and mission. It’s a big-budget agency. Scruitiny of it should not go away just because the shuttle is now history.

the origional blog address is http://stevemort.squarespace.com/blog/2011/8/5/space-coverage-beyond-the-shuttle.html as always please feel free to share using the buttons below Jay

Featured Blog: Making the MOS-t of shooting vox-pops by Steve Mort

this is a blog i read recently by Steve Mort and thought you may like to read it as well 🙂

Shooting M.O.S. (Man On the Street) is something you’ll often have to do as a video journalist. M.O.S., sometimes called vox-pops from the Latin ‘vox populi’, is also one of the more difficult tasks when working solo. You’ll often be working in a crowd and will need to be ready to get people’s comments very quickly – negligible set-up time.

Here is a list of ten points I put together that I think are important to remember when shooting M.O.S. in the field:

1 – Use a tripod. M.O.S. shoots look really dreadful when you’re trying to hold a camera in one hand and a mic in the other while looking the interviewee in the eye. 

2 – Because you are using a tripod, try to pick a location where you do not have to move around too much. Pick an area to shoot with plenty of foot traffic. It is best if you can get people to come to you, rather than having to carry your camera and tripod to a different spot each time.

3 – Select a significantly different backdrop for each M.O.S. It will look strange if the background is the same each time, but the person on camera is different. Remember, you will probably be editing these together into a sequence. You can often achieve a different backdrop just by swinging the camera around.

4 – Be mindful of the sun in the sky. Cloudy days tend to be easier… the light remains constant so the temperature of the shot doesn’t fluctuate between interviewees in your M.O.S. sequence. Otherwise, try to pick an area of shade where the background isn’t too bright either.

5 – Use a wireless lav microphone that you can pin on someone quickly. If you are trying to hold a microphone in front of the interviewee, it’ll be very tough to ensure they remain in frame because you will need to be in front of the camera too. If you use a wireless lav, you can clip it on them and stand where you can see the viewfinder. You can also have the subject stand further away from the camera, allowing you to make more use of the full range of the lens, achieving more depth to the shot. In addition, make sure you hide the cable connecting the mic to the transmitter unit by either framing it out of the shot, or tucking it under clothing.

6 – Try to frame each person approximately the same. It doesn’t matter if some are framed slightly tighter than others. But if you have a mix of super-wide and super-tight shots, it will look very disjointed when you edit them back-to-back. If you are shooting in a high enough definition format, it’s possible to adjust the framing in post-production by cropping and zooming.

7 – Mix the direction that you have the interviewees looking – some camera-left, some camera-right. When you edit your footage together, you should alternate between left-looking and right-looking shots. This will help guard against jump cuts. You can also make use of functions such as Final Cut Pro’s ‘flop’ tool to reverse shots if necessary. However, be very careful to take note of anything framed in the shot that would be inaccurate when flipped, such as writing. 

To help illustrate this point, here is an example of M.O.S. I gathered at the recent NBA Finals in Miami for AFP Television. The vox-pops are part of a sequence of shots sent out to AFP client broadcasters. This is my own upload with my own lower-thirds. If you wish to see additional footage from the shoot, you can do so here.

8 – Make sure you color balance your camera before you start shooting. If you shoot in auto-mode you may end up with soundbites with wildly varying color balances. This, of course, varies according to which camera you are using. Save yourself time in post-production by setting your camera values ahead of time. Setting picture profiles for cloudy or bright days can save time.

9 – Get the name of your subjects on tape. Use that to set audio levels. People have dramatically different tones of voice and speaking volumes. You don’t want to boost your levels for a quiet speaker, then end up with distorted sound for the rest of your shoot.

10 – Never take your eyes off your camera. You’re in a busy place. Never trust anyone you don’t know around your gear – not even for a second.

the origional blog address is http://stevemort.squarespace.com/blog/2011/6/17/making-the-mos-t-of-shooting-vox-pops.html as always please feel free to share using the buttons below Jay

Featured Blog: Step-by-Step Guide to Getting Started with Retail Photography by Simon Bray

this is a blog i read recently by Simon Bray and thought you may like to read it as well 🙂

Retail photography may not be something you’ve ever considered as a photographer, but it covers a lot of similar ground to commercial shoots, so if you’ve ever worked commercially, then these simple steps may well help you convert your skills to the retail market. I was recently asked to photograph the opening of a new coffee house in Manchester, so I’ll be running you through my experiences step-by-step as I go.


Build a Portfolio

Your first job when looking to enter the realm of retail photography is to find some products to photograph, which can be much easier said than done. To begin with, you’ll need to build up a body of work that demonstrates your abilities to photograph produce and retail items.

Think about the type of work you’d like to be doing for others, maybe fresh food, technology or jewelry, then find some examples and photograph them yourself. This might require you building a mini table top studio in your kitchen, but all you really need are some plain surfaces and a couple of light sources, just as you would for any still life project.

1

Finding Clients

When you feel ready, go and visit local retailers. Independent stores are more likely to be receptive as they’ll be making their own decisions about publicity and money rather than having to ask the head office!

Be sure you take business cards, leave contact details and have your online portfolio or website up to scratch with examples of your work so they can see what you are able to offer. Try to avoid talking about money at first. You want to build relationship, foster sense of trust and encourage the interested parties that it will be of benefit for them!

For this shoot, I was asked by a friend to photograph the launch of the new coffee shop that he was opening. I didn’t have to work too hard to get the shoot, but now that I have this body of work, I’ll be able to approach future potential clients.

2

Research Your Subject Matter

Once you’ve secured a shoot, it’s important that you understanding the subject matter that you’re working with. As well as understanding the photographic side such as form and shape, it helps to know where the product is from, how it’s made, what it’s used for and what sort of people buy it to give you the best chance of taking relevant images.

For my coffee house shoot, I took time to learn the coffee making process that the staff go through in order to understand how to best capture it photographically.

3

How Will the Images be Used?

When discussing the shoot, ensure that you understand what the retailer plans to do with the images. Are they to be used for advertising, a promotional campaign, their website, social networks or a printed publication? Do you need to try to sum up the whole business in one image? Do you need to leave a certain space in the images of products in order for text to be placed in?

I knew that my shots of the coffee house would be the first public images and therefore I needed to cover all the elements involved, the staff, the physical building, the decor, the coffee, cakes and the guests.

4

The Style of the Shoot

Understanding what the images will be used for and learning about the products will go a long way in informing the style in which you shoot everything, but it’s worth establishing with the owner the feel and mood that they’re after.

Some will want a very formal and structured shoot that captures the shop and produce in a straight forward manor. At the opposite end of the scale, some will prefer a more reportage style shoot that captures the store in a more relaxed and spontaneous style.

If you’re shooting within the context of the store, that will automatically lend itself to a more informal style, but it may be that the owner wants certain products shot on their own, for which you’ll need a more structured set up.

For this shoot, I discussed with the coffee house owner what sort of images they were after and considering it was the opening night, there wasn’t really scope for any structured shots, so I took a reportage approach and worked through my shot list as the evening went on.

5

Focus on Branding

In a photographic sense, you need to consider how you’re going to make the store and product stand out compared to others on the market. It’s important to give a strong sense of the brand, what they stand for and the key elements of their products that set them apart.

This could involve including the brand name or logo which would immediately identify the brand, but this doesn’t have to be done in an obvious or blatant way. Think about ways to include elements that are creative and interesting. Certain design or decor features may set this particular brand apart from others, which you can look to highlight and emphasise in your images.

6

Summary of the Shoot

For my coffee house shoot, there were certain elements which informed my decisions behind the shots I made.

It was important to get images of people enjoying the product, which is vital for consumables and food. This would be different for something such as fashion, as you’d have a dedicated shoot. For something like a technology product, you’d want to display someone using the product in a certain context.

I made sure I captured the architecture. The building had been converted from a pub for this specific purpose, which had taken months of work. It was important for the local area and for the new owners to have the building captured in it’s new guise.

One of the most important things about the service industry is the staff. I wanted to ensure I had shots of them in their new home looking relaxed and happy at work!

7

What Would I Do Differently Next Time?

Considering the informal reportage style of my coffee house shoot, I was very pleased with the images I was able to get, but I wished I’d gone in an hour earlier to get some more formal shots of the product, the decor and building without the staff and customers rushing around!

I’m also still learning that I need to take more time with each shot. Due to the environment and the feeling of having to photography everything in a short space of time, I rush around capturing images, but then when I get home to look through, wish I’d taken a minute or two more with some of the key shots to get them just right.

8

Taking on Your Shoot

Retail photography can be challenging at times, as each shoot will pose different difficulties depending on the product, the requirements and what the images are to be used for. However, I’d say that it’s a challenge worth embracing.

It will force you to think creatively and can be a good earner if you build relationships in the right areas and gather a solid portfolio and recommendations from businesses in your area.

9

the origional blog address is http://photo.tutsplus.com/articles/shooting-articles/step-by-step-guide-on-getting-started-with-retail-photography/?utm_source=feedburner&utm_medium=feed&utm_campaign=Feed%3A+Phototuts+%28Phototuts%2B%29 as always please feel free to share using the buttons below Jay If you enjoy this blog and wish to donate to its running please do so here (completely optional so if you dont want to you dont have to)